I love working on home furniture and like giving tips to others.
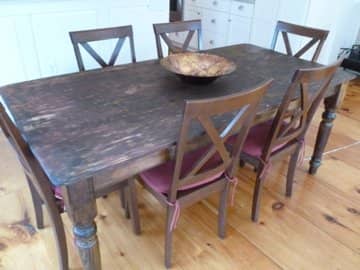
Our old 6' x 3' table that seated six.
I remember we bought our 6-foot pine table when our first child was born. It seemed enormous to us! Two young people and a tiny baby, why did we buy so big?
Well, roll on another 16 years and not only are there more kids, but they are huge and their friends are huge and, quite frankly, that enormous 6-foot table became way too small!
I looked into new tables. But with three active boys, I didn't want something so fine that I'd always be fretting about glass marks, spills, and scratches. I also didn't particularly want to drop a grand or two on a piece of furniture.
But we found a solution for a beautiful new table that is so easy and inexpensive, it's just ridiculous!
Make Your Existing Table Bigger With a 4' x 8' Board
Simply overlay your existing table with a larger board that has an attractive veneer on one face—this is birch. Stain and gloss the top to match the existing legs (or stain and gloss the legs too like we did).
The entire project including stain and gloss came in under $100, plus a few hours of my time. Five years down the road, it's still serving us well. And we have not outgrown it!
Materials Needed
- 1 4' x 8' plywood board (with veneer on one side)
- 4 lengths of wood, each 1" x 1" x 2' long
- 2 short pieces of wood, 4" x 1" x 1"
- 2 2" nails
- wood edging tape (see link below)
- wood glue
- wood stain and wood gloss of your choice
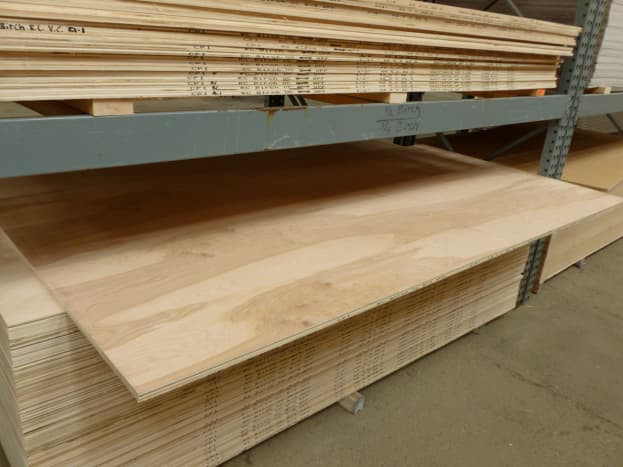
The unfinished 8' x 4' plywood board.
How to Make Your Dining Room Table Bigger With a 4' x 8' Board
Here's the step-by-step process:
Step 1: Decide on the Right Size
Choose how large you want your table to be. (Keep in mind that it must work proportionally with your existing table's legs.) The boards are sold 4' x 8', but you can ask to have it cut down if you want it smaller.
Note: You must get a board that has a veneer (such as birch) on one side.
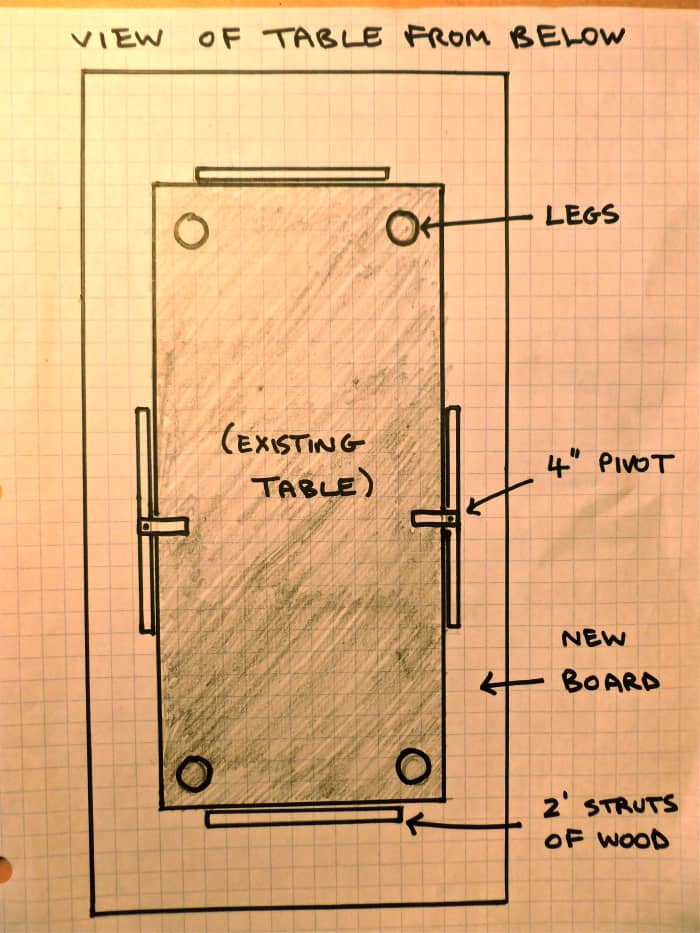
Step 2: Glue Wood to the Underside of Your Board
Now take your four 2' lengths of wood and glue them to the underside (non-veneer side) of your board in an open rectangle so that when the board is laid on top of the table, the table will fit reasonably snugly. It doesn't have to be a tight fit, a little space OK to prevent slippage. Measure carefully because you want it set on straight. (See diagram.)
Step 3: Nail the Struts
Take the two 2" nails and nail the two 4" struts to the center of each of the two long struts running along the two longer edges of the board. (See diagram at right.) This will allow you to pivot each small strut and "lock" the board onto the table so that it cannot be tipped up accidentally. You will need to look carefully at your own table and think this through, making any adjustments necessary, as every table is different.
Step 4: Measure the Board and Apply Wood Edging Tape
Place the board on the table, veneer side up, and measure the total edge of your board. Apply the wood edging tape, following the manufacturer's directions. (This is usually a process that involves ironing on the tape in order to dissolve the pre-applied adhesive.)
Step 5: Stain and Gloss the Board
Transform your board and its new wood trim with a beautiful wood stain of your choosing. Again keep in mind the look and color of the existing table's legs. Can you stain those to match? We did! When you are happy with the color, finish it with two coats of polyurethane, gloss, or semi-gloss, again your choice of finish. (You can also buy stain and gloss all-in-one to save time.)
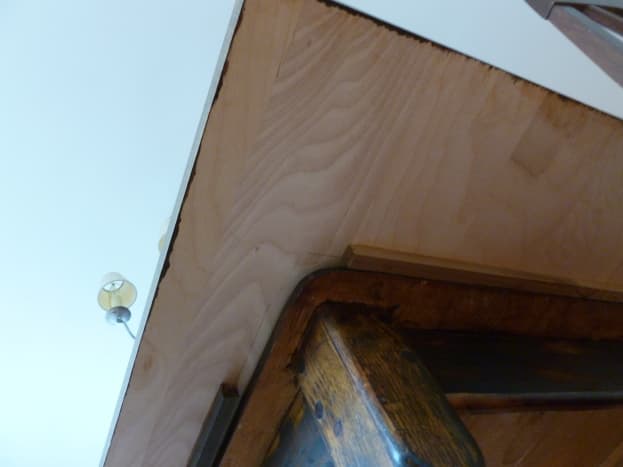
Struts hold the board in place on the old table (viewed from below).
This content is accurate and true to the best of the author's knowledge and is not meant to substitute for formal and individualized advice from a qualified professional.
poowool5 (author) from here in my house on May 02, 2012:
Thanks for the comments, everybody!
Good point, Marcy (that I probably should have made myself!) that this larger tabletop can be added and taken away as needed. Always good to have that option for larger groups.
ANd yes, Cyndi10, the ever-shrinking desk (like my ever-shrinking jeans...), I'm sure it would work well for this too.
Thanks for stopping by and sharing, janikon and summerberrie!
summerberrie on May 02, 2012:
poowool5, this is such a great hub for how to expand your table. I really enjoyed reading it and the do it yourself pictures were perfect!
janikon on May 02, 2012:
Very clever and inexpensive idea. Voted up and shared.
Cynthia B Turner from Georgia on May 02, 2012:
Clever, Clever idea. You took a lot of time with those instructions, too. Maybe something similar would work on my desk which seems to be shrinking! Good hub.
Marcy Goodfleisch from Planet Earth on May 02, 2012:
I cracked up at your "Doesn't that apron make me look fat?" comment!
Seriously - I love this hub! I've been trying to figure a way to 'expand' my petite dining table that's bigger on looks than on function. I hadn't thought of adding the underside braces to make a false top more stable. I would probably use it now and then (rather than all the time), but I sure do need it when I need it.
Voted up, useful, awesome and interesting! And shared!
poowool5 (author) from here in my house on April 28, 2012:
Whoops, sorry to be late getting back to your question, PJ. I bought the plywood from our local old-fashioned lumber store, the kind with a lumberyard out back. I am surprised Lowes didn't sell these. Perhaps try calling a few places to ask in advance so you don't have wasted trips. Hope you can locate it. What I smugly enjoy most is the comments of my friends with expensive tastes as they admire it, not realizing it didn't cost me an arm and a leg!
PJ on April 18, 2012:
Great idea! This is JUST what I was looking for. Thanks so much for sharing! One question - where did you buy your plywood board? I checked my local home improvement store (Lowe's) but didn't come across any with a veneer on one side. Thanks again for sharing your wonderful idea!
poowool5 (author) from here in my house on March 31, 2012:
Thanks for the comment, Robie. You know, for little money, it really can give a table a new lease of life. I didn't think we would keep it for so long, but it still looks good after years of daily use, so you know, if it ain't broke...
Today we dyed Easter eggs right on the table, no protective newspaper etc...guess not much gets through a couple coats of polyurethane, because it didn't affect the table at all. And that's what I need with three boys...ROBUST furniture ;)
Thanks for the comment!
Robie Benve from Ohio on March 31, 2012:
Great idea! I have an old table that on top of being small, has some water damage, we keep it in the (non-used) dining room for the kid's homework, and this plywood board treatment may be just what it needs. Thanks for sharing, and I love the pictures, very helpful! Ciao
poowool5 (author) from here in my house on March 12, 2012:
Thanks Steph and Jennifer. I thought either it would wear down or I'd tire of it by now, but not so (pic above is current, ie. 5 years after making it)!
jenniferg78 from Philadelphia, PA on March 12, 2012:
This is a great idea and the picture illustration are really helpful. +useful
Stephanie Marshall from Bend, Oregon on March 11, 2012:
Great idea and totally rated up! I have 4 kids and it seems like the table is never big enough. Then, if any of my friends come over with their kids... ugh! Nice tips and easy to do. Rated up - Steph
poowool5 (author) from here in my house on March 11, 2012:
Thanks Lizam1. The board is only 3/4" thick, so, yes, the table would be higher, but only by 3/4". Not really noticeable.
Lizam1 on March 10, 2012:
Nice idea - one question does laying the board on top make the table an odd height?
poowool5 (author) from here in my house on March 10, 2012:
Thanks for commenting, Liz! Sometimes it's the simple things that have the biggest impact!
lizlauder from Western New York on March 10, 2012:
This is such a great idea! And it looks beautiful.
poowool5 (author) from here in my house on March 10, 2012:
Thanks cloverleaffarm, anything to save a few bucks, right? Actually, I find it hugely satisfying to pull off a DIY job like this. A little domestic pride :)
Healing Herbalist from The Hamlet of Effingham on March 10, 2012:
Great job on both the hub, and the table. Voted up and useful!