Home »
» Revit Draw In 3D : Creating Revit 3d Presentation Views That Look Cool! - revitIQ / Revit has an extensive interface which holds a large number of tools arranged in a ribbon structure.
Revit Draw In 3D : Creating Revit 3d Presentation Views That Look Cool! - revitIQ / Revit has an extensive interface which holds a large number of tools arranged in a ribbon structure.. First, it is a really quick tool. Well the good news is that in revit you can place standard annotations in any 3d view if you follow a few simple steps. This video will show you how to draw a 3d technical detail in revit. Revit has an extensive interface which holds a large number of tools arranged in a ribbon structure. Note that each tool shows a very informative tooltip when you hove your mouse over the tool in revit.
Draw more horizontal and vertical reference planes like this. there is a lot of ways to modify elements in revit, but the align tool is the most useful. This tutorial will show you how to create an annotated axonometric diagram / drawing in revit, using the section box, visibility/graphics overrides, graphic display options, and text annotations. Revit creates a perspective 3d view and assigns a name to the view: Revit has an extensive interface which holds a large number of tools arranged in a ribbon structure.
Parametric Skip - Revit Family 3D model | CGTrader from img-new.cgtrader.com Ok, this is a tip how you can select the work plane by name: The main drawing interface is somewhat similar to those of other cad applications. Well the good news is that in revit you can place standard annotations in any 3d view if you follow a few simple steps. Most elements that you want to move in. Click in the drawing area to place the camera. This video will show you how to draw a 3d technical detail in revit. You have a set of instructions and a menu bar at the top of the screen a huge portion of your work process in revit is annotating and detailing your 3d model with 2d details and annotations. First, it is a really quick tool.
Create a 3d view and set up the if you haven't already, then download the graitec advance powerpack for autodesk revit today for a number of useful additional tools on modelling.
Revit has an extensive interface which holds a large number of tools arranged in a ribbon structure. In this course, shaun bryant takes you through how to work with autocad drawings that are imported or linked into revit architecture. Create a 3d view and set up the if you haven't already, then download the graitec advance powerpack for autodesk revit today for a number of useful additional tools on modelling. Don't forget to add dimensions, and constraint them to be in equal distance. Revit will gives an error message if the content is greater than 20 miles from the origin. Select the work plane, and you should. This tutorial will show you how to create an annotated axonometric diagram / drawing in revit, using the section box, visibility/graphics overrides, graphic display options, and text annotations. How to import this detail into your set of drawings via drafting view. I wrote a post years ago about importing autocad 2d drawing to revit model, the user interface in revit has evolved significantly over time and i feel there is a need to revisit this topic. This page describes the most common tools that are available in revit. Draw more horizontal and vertical reference planes like this. Note that each tool shows a very informative tooltip when you hove your mouse over the tool in revit. Click in the drawing area to place the camera.
Click in the drawing area to place the camera. Draw more horizontal and vertical reference planes like this. Built for building information modeling. Revit creates a perspective 3d view and assigns a name to the view: You have a set of instructions and a menu bar at the top of the screen a huge portion of your work process in revit is annotating and detailing your 3d model with 2d details and annotations.
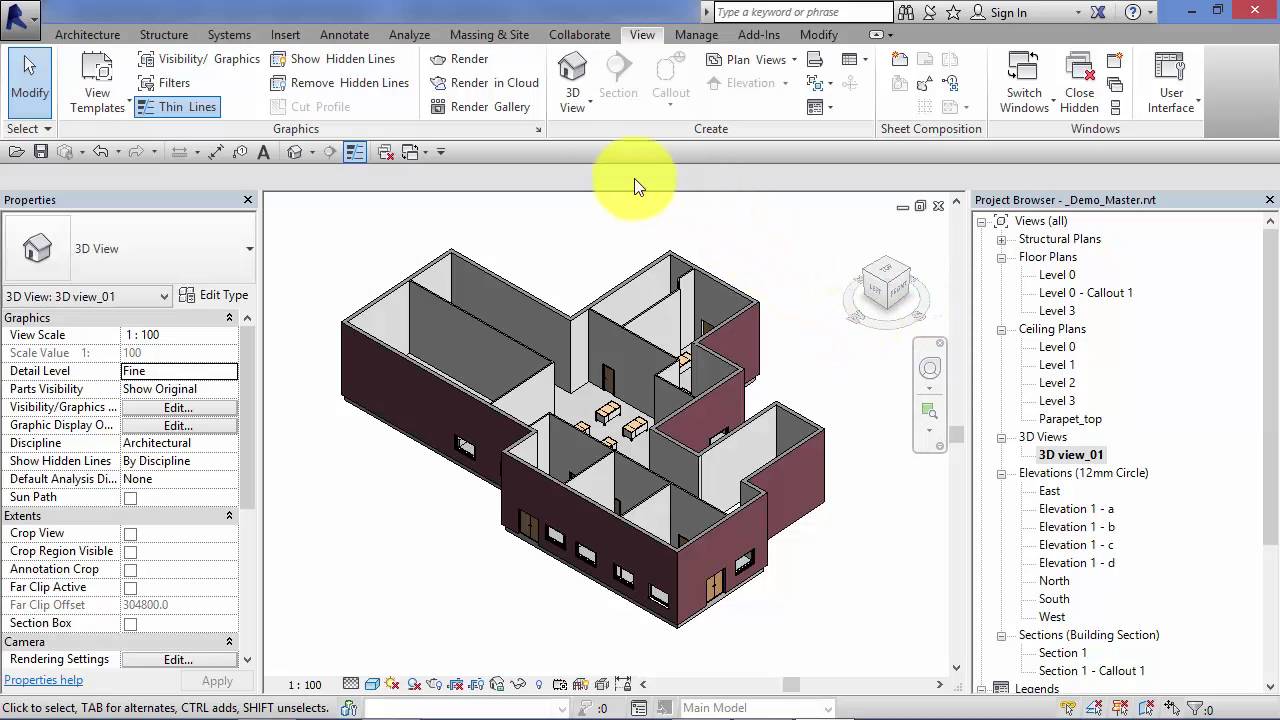
3D Detailing in Revit - RevThat from 4.bp.blogspot.com You have a set of instructions and a menu bar at the top of the screen a huge portion of your work process in revit is annotating and detailing your 3d model with 2d details and annotations. Revit will gives an error message if the content is greater than 20 miles from the origin. This tutorial will show you how to create an annotated axonometric diagram / drawing in revit, using the section box, visibility/graphics overrides, graphic display options, and text annotations. Revit will ask you in which work plane you want to work with. Built for building information modeling. This article describe the tools that most beginners don't know about, but they should. Don't forget to add dimensions, and constraint them to be in equal distance. Figure 1 is what my 3d section looks like in a shaded visual style, cutting through the stair and roof.
Revit will gives an error message if the content is greater than 20 miles from the origin.
In this course, shaun bryant takes you through how to work with autocad drawings that are imported or linked into revit architecture. Revit creates a perspective 3d view and assigns a name to the view: First, it is a really quick tool. You have a set of instructions and a menu bar at the top of the screen a huge portion of your work process in revit is annotating and detailing your 3d model with 2d details and annotations. Note that each tool shows a very informative tooltip when you hove your mouse over the tool in revit. Well the good news is that in revit you can place standard annotations in any 3d view if you follow a few simple steps. Most elements that you want to move in. Draw more horizontal and vertical reference planes like this. The most helpful revit tools are often underused by beginners. there is a lot of ways to modify elements in revit, but the align tool is the most useful. I wrote a post years ago about importing autocad 2d drawing to revit model, the user interface in revit has evolved significantly over time and i feel there is a need to revisit this topic. Click in the drawing area to place the camera. Select the work plane, and you should.
Built for building information modeling. Don't forget to add dimensions, and constraint them to be in equal distance. Revit will ask you in which work plane you want to work with. Revit creates a perspective 3d view and assigns a name to the view: You have a set of instructions and a menu bar at the top of the screen a huge portion of your work process in revit is annotating and detailing your 3d model with 2d details and annotations.
Module 6: Unit 6: Revit Architecture: Default 3D view ... from i.ytimg.com This video will show you how to draw a 3d technical detail in revit. Click in the drawing area to place the camera. Revit will gives an error message if the content is greater than 20 miles from the origin. Don't forget to add dimensions, and constraint them to be in equal distance. Well the good news is that in revit you can place standard annotations in any 3d view if you follow a few simple steps. Revit creates a perspective 3d view and assigns a name to the view: Select the work plane, and you should. Revit will ask you in which work plane you want to work with.
The main drawing interface is somewhat similar to those of other cad applications.
First, it is a really quick tool. This article describe the tools that most beginners don't know about, but they should. How to import this detail into your set of drawings via drafting view. Select the work plane, and you should. You have a set of instructions and a menu bar at the top of the screen a huge portion of your work process in revit is annotating and detailing your 3d model with 2d details and annotations. The most helpful revit tools are often underused by beginners. Ok, this is a tip how you can select the work plane by name: Revit creates a perspective 3d view and assigns a name to the view: Revit will gives an error message if the content is greater than 20 miles from the origin. Note that each tool shows a very informative tooltip when you hove your mouse over the tool in revit. I wrote a post years ago about importing autocad 2d drawing to revit model, the user interface in revit has evolved significantly over time and i feel there is a need to revisit this topic. Draw more horizontal and vertical reference planes like this. Figure 1 is what my 3d section looks like in a shaded visual style, cutting through the stair and roof.


Tidak ada komentar:
Posting Komentar